> ## Documentation Index
> Fetch the complete documentation index at: https://docs.vaanivoice.ai/llms.txt
> Use this file to discover all available pages before exploring further.
# Generate an API Key
> Create, use, and manage API keys to authenticate your Vaani API requests
Your API key authenticates every request you make to the Vaani API. Think of it like a password for your application — anyone with the key can trigger calls, read transcripts, and access your account's data. This page covers creating, using, and managing your keys.
**Before you start:** You need a Vaani account with a configured agent and telephony set up. If you haven't completed these steps yet:
* [Create an Account](/getting-started/create-account)
* [Create an Agent](/getting-started/create-agent)
* [Set Up Telephony](/getting-started/setup-telephony)
## Create an API Key
In the dashboard, navigate to **Settings → API Keys**.
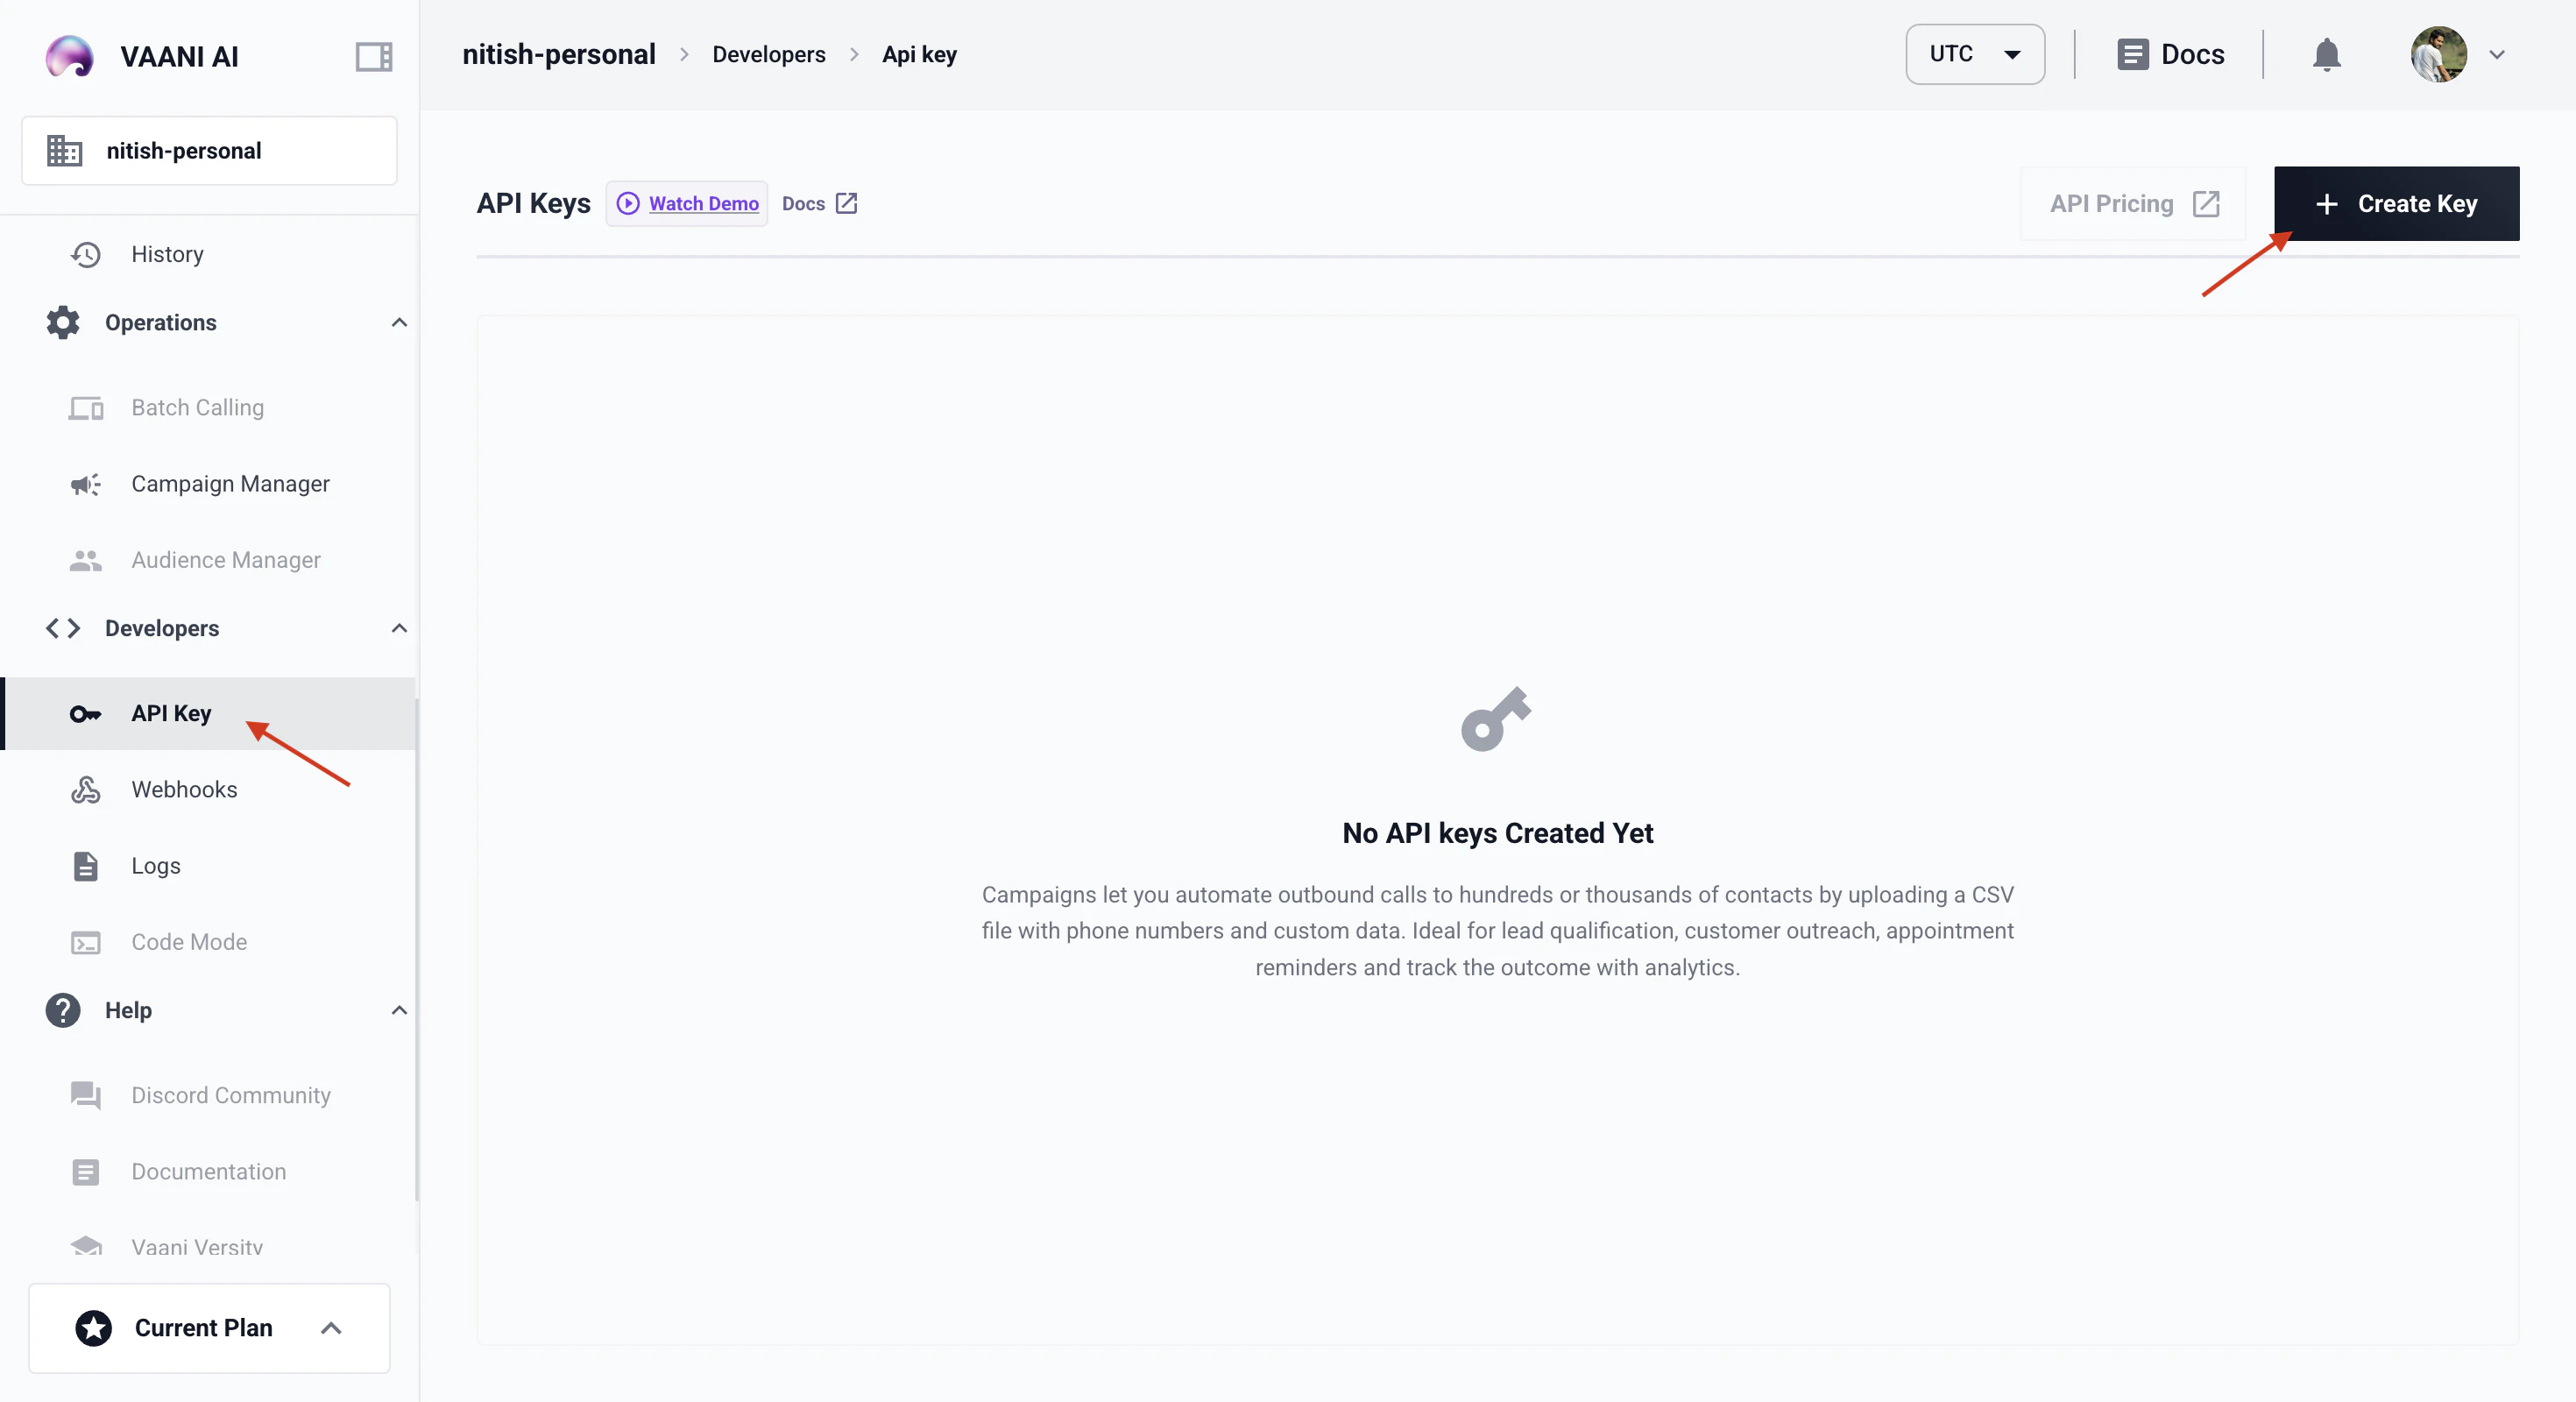 Click **Generate API Key**. Give it a descriptive name that tells you what it's for — e.g. `production`, `staging`, `local-dev`, or `campaign-automation`.
Copy the key immediately and store it somewhere safe.
Your API key is shown **only once** at creation time. If you lose it, you'll need to generate a new one — there's no way to retrieve an existing key.
## Using Your API Key
Include your API key as a header in every request to the Vaani API:
```bash cURL theme={null}
curl -X POST 'https://api.vaanivoice.ai/api/trigger-call/' \
-H 'X-API-Key: YOUR_API_KEY' \
-H 'Content-Type: application/json' \
-d '{ "agent_id": "YOUR_AGENT_ID", "contact_number": "+919876543210" }'
```
```python Python theme={null}
import os
import requests
headers = {
"X-API-Key": os.getenv("VAANI_API_KEY"),
"Content-Type": "application/json"
}
response = requests.post(
"https://api.vaanivoice.ai/api/trigger-call/",
headers=headers,
json={
"agent_id": "YOUR_AGENT_ID",
"contact_number": "+919876543210"
}
)
```
Your API key is **workspace-scoped** — it grants access to all agents, call data, and settings within your workspace. There's no per-agent key scoping.
## Storing Your Key Securely
Never hardcode your API key in source code. Here's how to handle it in different environments:
**Local development** — use a `.env` file:
```bash theme={null}
VAANI_API_KEY=your-api-key-here
```
Then load it in your code with a library like `python-dotenv`:
```python theme={null}
from dotenv import load_dotenv
import os
load_dotenv()
api_key = os.getenv("VAANI_API_KEY")
```
**Production** — use your platform's secrets manager (AWS Secrets Manager, GCP Secret Manager, HashiCorp Vault, etc.).
**CI/CD** — use your pipeline's built-in secrets or environment variables (GitHub Secrets, GitLab CI Variables, etc.).
Never commit API keys to version control. Add `.env` to your `.gitignore` file.
## Managing Multiple Keys
As your usage grows, you'll want multiple API keys:
* **Separate keys per environment** — `dev`, `staging`, `production`. If a dev key leaks, your production traffic isn't affected.
* **Separate keys per integration** — if you have multiple systems calling the API, give each its own key so you can revoke one without disrupting others.
* **Separate keys per team member** — useful for tracking who's making which calls during development.
You can have multiple active keys simultaneously. To **rotate a key** safely:
1. Generate a new key
2. Update your application to use the new key
3. Verify everything works
4. Delete the old key
Label your keys clearly. When something goes wrong at 2 AM, you'll want to know which key `production-dialer` is vs. `test-script`.
## Troubleshooting
Your API key is either missing, invalid, or has been deleted. Check that: (1) you're including the `X-API-Key` header (not `Authorization` or another header name), (2) the header name is exactly `X-API-Key` (it's case-sensitive), (3) there's no extra whitespace around the key value, and (4) the key hasn't been deleted from your dashboard.
API keys can't be recovered after creation. Generate a new key from **Settings → API Keys**, update your application with the new key, and optionally delete the old one (if you're not sure which key it was, you can delete all keys and start fresh).
Not currently. API keys are workspace-scoped and grant access to all agents and data in the workspace. If you need full isolation between different sets of agents, use separate workspaces.
**Video walkthrough coming soon.** Follow the steps above — they cover everything the video will.
## Next Step
Use your agent\_id and API key to make your first outbound call
Click **Generate API Key**. Give it a descriptive name that tells you what it's for — e.g. `production`, `staging`, `local-dev`, or `campaign-automation`.
Copy the key immediately and store it somewhere safe.
Your API key is shown **only once** at creation time. If you lose it, you'll need to generate a new one — there's no way to retrieve an existing key.
## Using Your API Key
Include your API key as a header in every request to the Vaani API:
```bash cURL theme={null}
curl -X POST 'https://api.vaanivoice.ai/api/trigger-call/' \
-H 'X-API-Key: YOUR_API_KEY' \
-H 'Content-Type: application/json' \
-d '{ "agent_id": "YOUR_AGENT_ID", "contact_number": "+919876543210" }'
```
```python Python theme={null}
import os
import requests
headers = {
"X-API-Key": os.getenv("VAANI_API_KEY"),
"Content-Type": "application/json"
}
response = requests.post(
"https://api.vaanivoice.ai/api/trigger-call/",
headers=headers,
json={
"agent_id": "YOUR_AGENT_ID",
"contact_number": "+919876543210"
}
)
```
Your API key is **workspace-scoped** — it grants access to all agents, call data, and settings within your workspace. There's no per-agent key scoping.
## Storing Your Key Securely
Never hardcode your API key in source code. Here's how to handle it in different environments:
**Local development** — use a `.env` file:
```bash theme={null}
VAANI_API_KEY=your-api-key-here
```
Then load it in your code with a library like `python-dotenv`:
```python theme={null}
from dotenv import load_dotenv
import os
load_dotenv()
api_key = os.getenv("VAANI_API_KEY")
```
**Production** — use your platform's secrets manager (AWS Secrets Manager, GCP Secret Manager, HashiCorp Vault, etc.).
**CI/CD** — use your pipeline's built-in secrets or environment variables (GitHub Secrets, GitLab CI Variables, etc.).
Never commit API keys to version control. Add `.env` to your `.gitignore` file.
## Managing Multiple Keys
As your usage grows, you'll want multiple API keys:
* **Separate keys per environment** — `dev`, `staging`, `production`. If a dev key leaks, your production traffic isn't affected.
* **Separate keys per integration** — if you have multiple systems calling the API, give each its own key so you can revoke one without disrupting others.
* **Separate keys per team member** — useful for tracking who's making which calls during development.
You can have multiple active keys simultaneously. To **rotate a key** safely:
1. Generate a new key
2. Update your application to use the new key
3. Verify everything works
4. Delete the old key
Label your keys clearly. When something goes wrong at 2 AM, you'll want to know which key `production-dialer` is vs. `test-script`.
## Troubleshooting
Your API key is either missing, invalid, or has been deleted. Check that: (1) you're including the `X-API-Key` header (not `Authorization` or another header name), (2) the header name is exactly `X-API-Key` (it's case-sensitive), (3) there's no extra whitespace around the key value, and (4) the key hasn't been deleted from your dashboard.
API keys can't be recovered after creation. Generate a new key from **Settings → API Keys**, update your application with the new key, and optionally delete the old one (if you're not sure which key it was, you can delete all keys and start fresh).
Not currently. API keys are workspace-scoped and grant access to all agents and data in the workspace. If you need full isolation between different sets of agents, use separate workspaces.
**Video walkthrough coming soon.** Follow the steps above — they cover everything the video will.
## Next Step
Use your agent\_id and API key to make your first outbound call