> ## Documentation Index
> Fetch the complete documentation index at: https://docs.vaanivoice.ai/llms.txt
> Use this file to discover all available pages before exploring further.
# Set Up Telephony
> Connect a phone number to your Vaani agent so it can make and receive real calls
Telephony connects your agent to the real phone network. Without it, your agent has no number to call from. This page walks you through connecting a phone number so your agent can start making outbound calls.
**Before you start:** You need a configured agent. If you haven't created one yet, head to [Create an Agent](/getting-started/create-agent) first.
## How Telephony Works in Vaani
When your agent makes a call, the recipient sees a phone number on their caller ID — just like a normal phone call. Vaani handles all the voice infrastructure behind the scenes (WebRTC, media servers, call routing). Your job is simply to connect a phone number.
A few things to know:
* Each agent needs at least one phone number assigned to it
* You can assign different numbers to different agents, or share one number across multiple agents
* You can override the caller ID on a per-call basis through the API
## Choose Your Setup Method
There are two ways to connect a phone number. Pick the one that fits your situation:
The simplest option — Vaani provisions a phone number for you directly. No external telephony provider needed.
**Best for:** getting started quickly, teams without existing phone infrastructure, testing.
In the dashboard, navigate to **Settings → Telephony**.
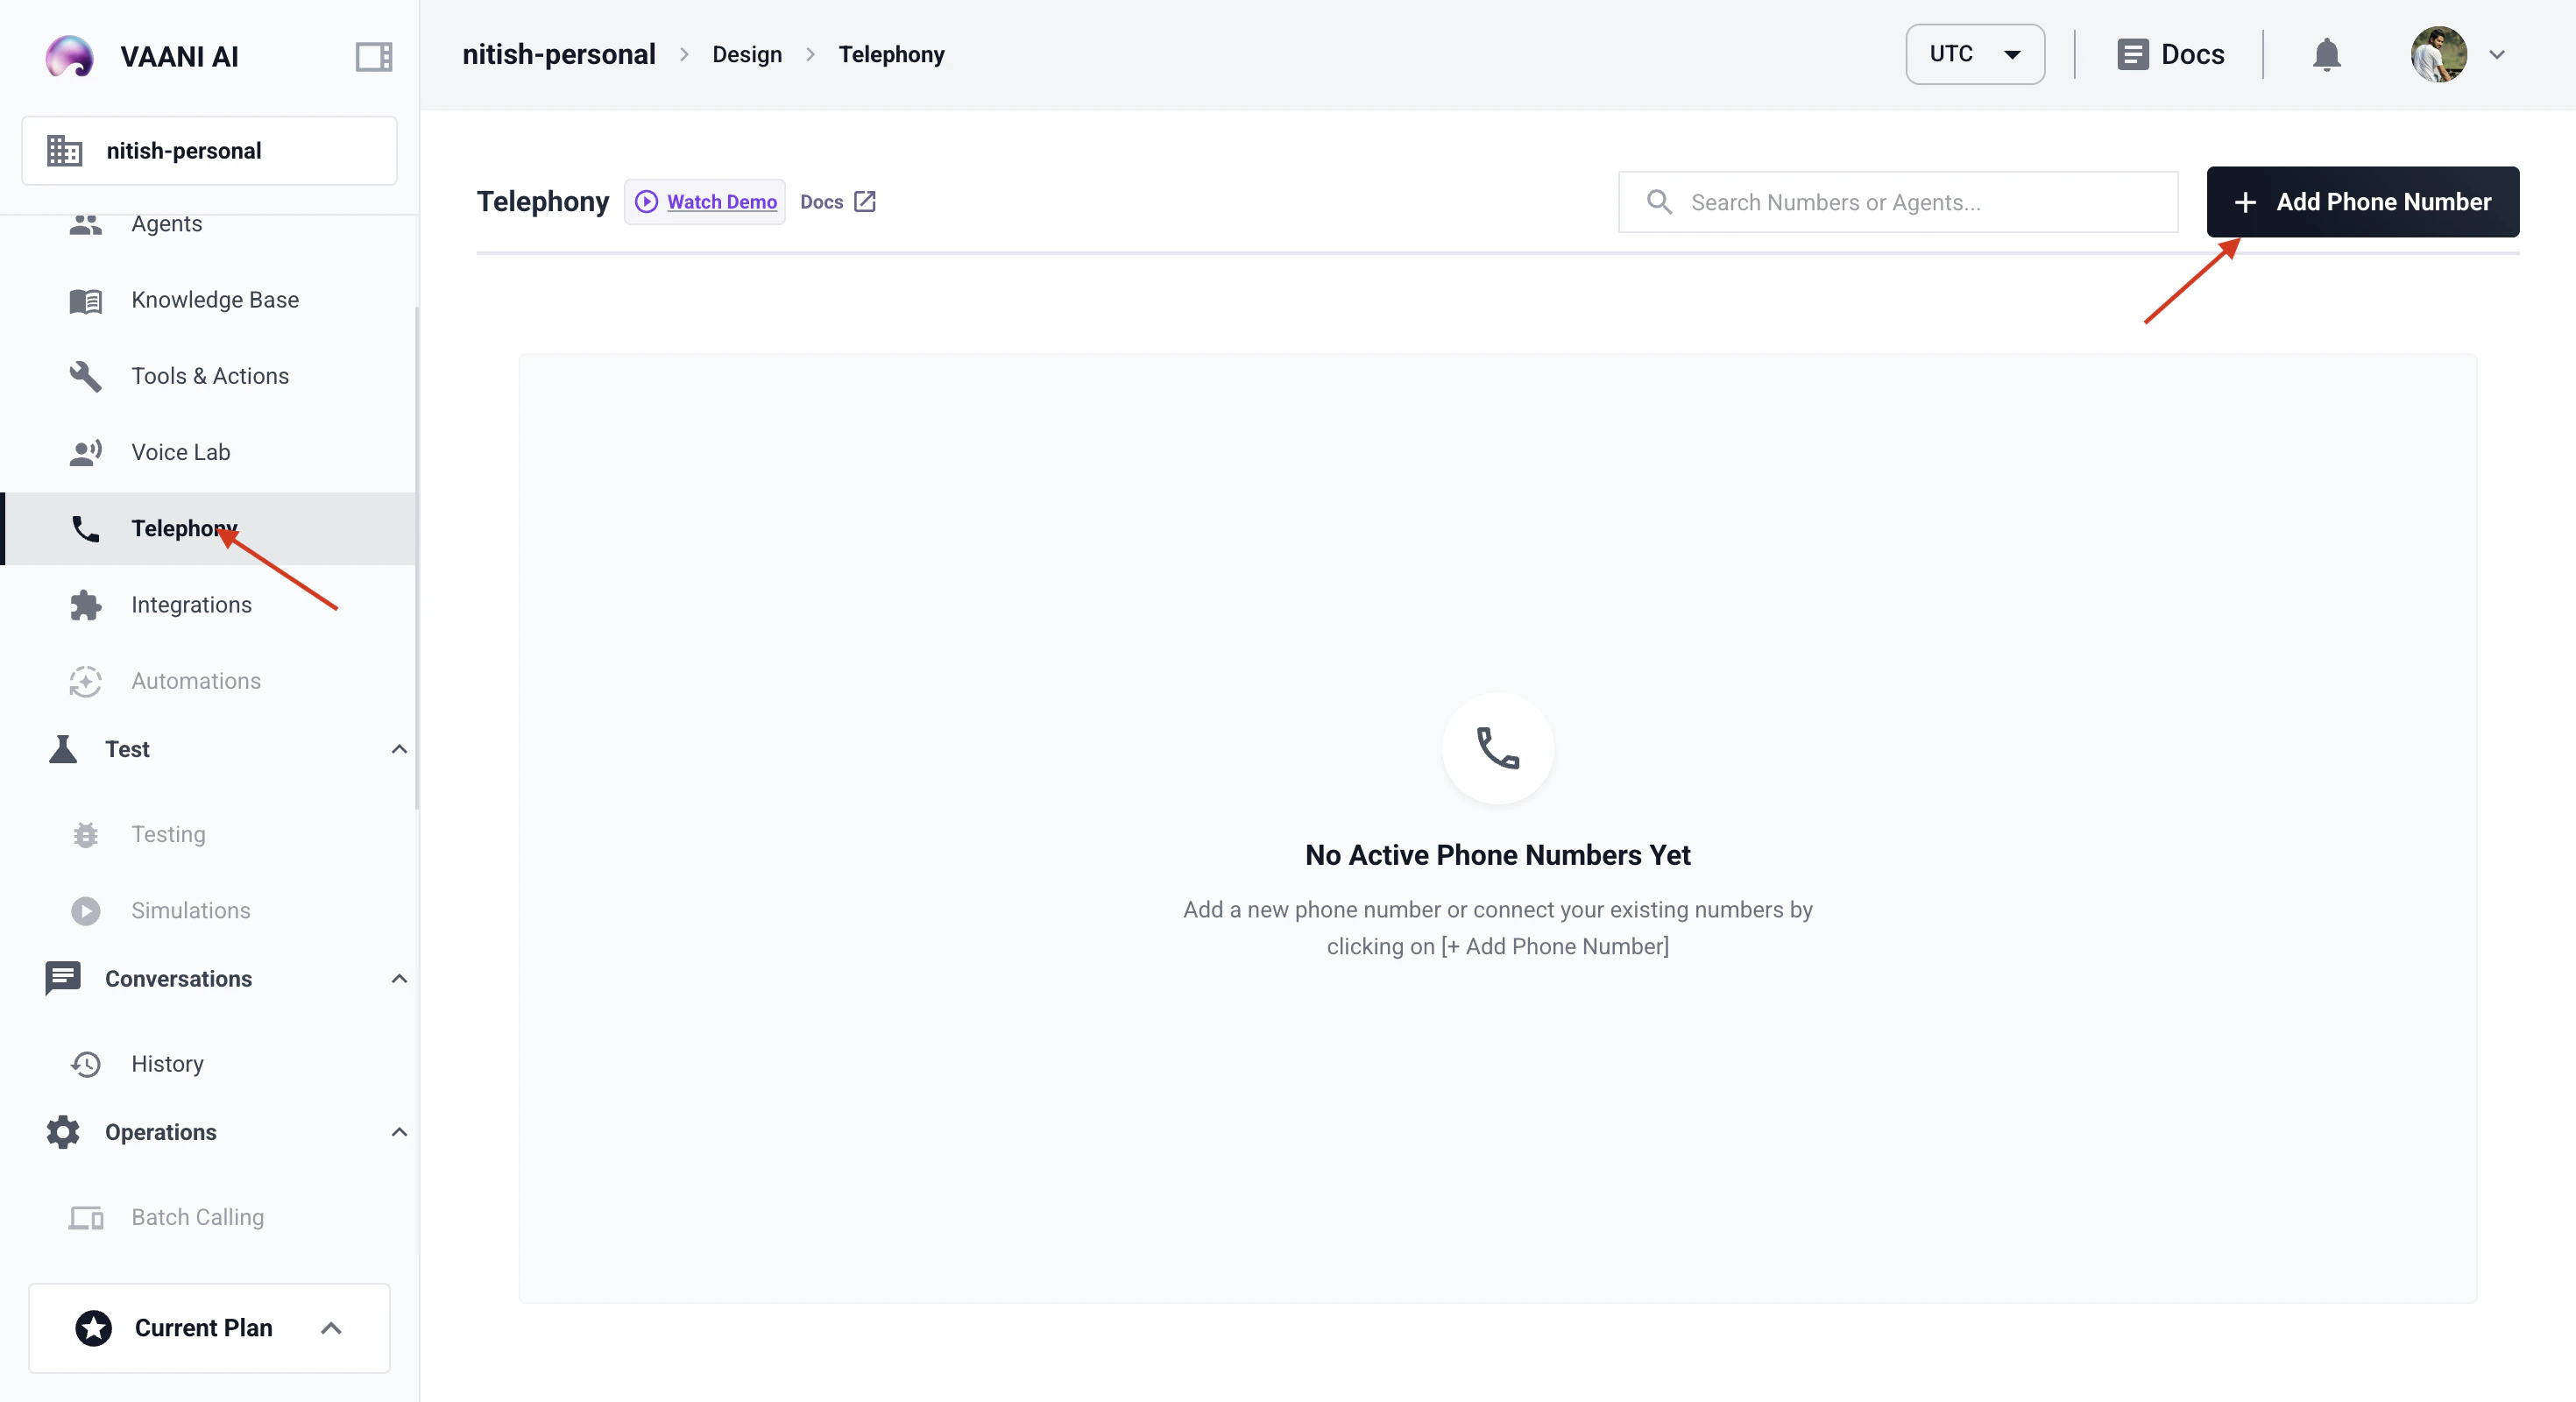 Click **Provision a Number**. Select your country and preferred area code. Vaani will assign an available number to your account.
Link the provisioned number to the agent you created. This number becomes the default caller ID for that agent's outbound calls.
Connect your existing telephony provider (e.g. Twilio, Telnyx, Vonage) via a SIP trunk. This routes calls through your provider's infrastructure.
**Best for:** teams with existing phone infrastructure, specific number requirements, regulatory or compliance needs.
In the dashboard, navigate to **Settings → Telephony**.
Click **Connect SIP Trunk** and enter your provider's SIP credentials:
* **SIP Host** — your provider's SIP server address
* **Username** — your SIP authentication username
* **Password** — your SIP authentication password
* **Port** — the SIP port (usually `5060` for UDP or `5061` for TLS)
Enter the phone number you want to use as the caller ID, in E.164 format (e.g. `+14155551234`).
Link the SIP trunk number to the agent you created.
## Phone Number Formats
All phone numbers in Vaani must use **E.164 format** — the international standard for phone numbers:
```
+[country code][number]
```
| Country | Format | Example |
| -------------- | --------------- | --------------- |
| United States | `+1XXXXXXXXXX` | `+14155551234` |
| India | `+91XXXXXXXXXX` | `+919876543210` |
| United Kingdom | `+44XXXXXXXXXX` | `+442071234567` |
Don't include spaces, dashes, or parentheses. `+1 (415) 555-1234` won't work — use `+14155551234`.
## Overriding the Default Number Per Call
By default, every call uses the phone number assigned to the agent. But you can override this on a per-call basis by passing `outbound_number` in the API request:
```json theme={null}
{
"agent_id": "your-agent-id",
"contact_number": "+919876543210",
"outbound_number": "+14155559999"
}
```
This is useful when you want different caller IDs for different campaigns, regions, or clients — without creating separate agents for each.
The `outbound_number` must be a number that's configured in your telephony settings. You can't use an arbitrary number. For a quick refresher on all the identifiers you'll encounter, see the [identifier reference table](/getting-started/overview#important-identifiers).
Start with a provisioned number for testing. You can always switch to a SIP trunk later without changing your agent configuration or `agent_id`.
## Troubleshooting
Check three things: (1) the phone number is assigned to your agent in the Telephony settings, (2) the `contact_number` in your API request is in E.164 format, and (3) the number you provisioned or connected is active and not suspended.
This usually means the outbound number isn't properly configured in your telephony settings. If you're using a SIP trunk, check that your provider has caller ID enabled and that the number is verified with them.
A SIP trunk is a virtual phone line that connects software (like Vaani) to the public phone network through an external provider. Think of it as a bridge between the internet and traditional phone calls. Providers like Twilio, Telnyx, and Vonage offer SIP trunking services. If you don't already have one, use Vaani's direct provisioning instead — it's simpler.
Vaani supports phone numbers in a growing list of countries. For the most current list of supported regions, check the Telephony settings page in your dashboard or contact support.
**Video walkthrough coming soon.** Follow the steps above — they cover everything the video will.
## Next Step
Create your API key to authenticate calls to the Vaani API
Click **Provision a Number**. Select your country and preferred area code. Vaani will assign an available number to your account.
Link the provisioned number to the agent you created. This number becomes the default caller ID for that agent's outbound calls.
Connect your existing telephony provider (e.g. Twilio, Telnyx, Vonage) via a SIP trunk. This routes calls through your provider's infrastructure.
**Best for:** teams with existing phone infrastructure, specific number requirements, regulatory or compliance needs.
In the dashboard, navigate to **Settings → Telephony**.
Click **Connect SIP Trunk** and enter your provider's SIP credentials:
* **SIP Host** — your provider's SIP server address
* **Username** — your SIP authentication username
* **Password** — your SIP authentication password
* **Port** — the SIP port (usually `5060` for UDP or `5061` for TLS)
Enter the phone number you want to use as the caller ID, in E.164 format (e.g. `+14155551234`).
Link the SIP trunk number to the agent you created.
## Phone Number Formats
All phone numbers in Vaani must use **E.164 format** — the international standard for phone numbers:
```
+[country code][number]
```
| Country | Format | Example |
| -------------- | --------------- | --------------- |
| United States | `+1XXXXXXXXXX` | `+14155551234` |
| India | `+91XXXXXXXXXX` | `+919876543210` |
| United Kingdom | `+44XXXXXXXXXX` | `+442071234567` |
Don't include spaces, dashes, or parentheses. `+1 (415) 555-1234` won't work — use `+14155551234`.
## Overriding the Default Number Per Call
By default, every call uses the phone number assigned to the agent. But you can override this on a per-call basis by passing `outbound_number` in the API request:
```json theme={null}
{
"agent_id": "your-agent-id",
"contact_number": "+919876543210",
"outbound_number": "+14155559999"
}
```
This is useful when you want different caller IDs for different campaigns, regions, or clients — without creating separate agents for each.
The `outbound_number` must be a number that's configured in your telephony settings. You can't use an arbitrary number. For a quick refresher on all the identifiers you'll encounter, see the [identifier reference table](/getting-started/overview#important-identifiers).
Start with a provisioned number for testing. You can always switch to a SIP trunk later without changing your agent configuration or `agent_id`.
## Troubleshooting
Check three things: (1) the phone number is assigned to your agent in the Telephony settings, (2) the `contact_number` in your API request is in E.164 format, and (3) the number you provisioned or connected is active and not suspended.
This usually means the outbound number isn't properly configured in your telephony settings. If you're using a SIP trunk, check that your provider has caller ID enabled and that the number is verified with them.
A SIP trunk is a virtual phone line that connects software (like Vaani) to the public phone network through an external provider. Think of it as a bridge between the internet and traditional phone calls. Providers like Twilio, Telnyx, and Vonage offer SIP trunking services. If you don't already have one, use Vaani's direct provisioning instead — it's simpler.
Vaani supports phone numbers in a growing list of countries. For the most current list of supported regions, check the Telephony settings page in your dashboard or contact support.
**Video walkthrough coming soon.** Follow the steps above — they cover everything the video will.
## Next Step
Create your API key to authenticate calls to the Vaani API